A smooth transition from TFS to GIT
Optimize your distribution model, design simple branches, and hone your merge strategy
Changing your current Version Control System (VCS) from a Centralized Version Control (TFS) to a Distributed Version Control is quite challenging, it requires cleaning your local TFS changes, analyzing and removing non-required files, folders, binaries, integrated tools, cleaning branches, merging and a lot of preparation to keep your check-in history as it was before. How many years of development are in there? You don’t want to lose anything, but you also want to keep your company on track with the latest tools.
It’s overwhelming!! I know!! So here you go:
5 ways to migrate from TFS to GIT!! Just kidding, there is plenty of documentation to do so, just check on Google… I’ll give you a hand, just because I wanted to list things and be popular:
- https://docs.microsoft.com/en-us/devops/develop/git/migrate-from-tfvc-to-git
- https://docs.gitlab.com/ee/user/project/import/tfvc.html
- https://www.linkedin.com/pulse/migrate-tfs-git-check-in-history-pankaj-sonawane/
You followed the tutorials and finally!! Everything is migrated to GIT; a new world of possibilities, a new era, an epic adventure… But…

Luckily, all your problems will be gone over time. The first steps are always the hardest. Don’t worry, let’s give it a try!
TL;DR
- Design your distribution model. A pull request strategy is a good option to start with. Choose a repository ‘owner’ who will be responsible for integrating all the changes from the contributors.
- Design your branches in the simplest way possible. Having a single Main branch for releases and a Develop branch for feature integrations are good options. You could also continue with a Centralized Model while you get familiar with the GIT ecosystem.
- Design your merging strategy. Start by Merging branches just to get used to it. That way, you can review your contributor’s changes. Follow with a Squash for better commit visualization and once you are comfortable enough, go with the powerful Rebase (or even interactive rebase).
Designing a workflow from a Centralized Model to a Distributed model is not “easy peasy lemon squeezy”. It requires thinking, planning, and a lot of trial and error. It may lead you to unpleasant frustrations.
If you wanted to beat Thanos you shouldn’t go to his head right away, you’ll miss the other movies. You won’t come up with a perfect solution right away, the Avengers worked hard as a team to come out with a plan to time travel and perform a massive “Ctrl + Z”.
Let your experience and team guide you to build a solid workflow by doing what you already know and craft a scalable foundation that will be prepared to grow. You’re an Avenger now. Act in consequence.
With that in mind, let’s see how we can prepare for growth and perform a smooth transition from TFS to GIT for us and our team. Keep It Simple for you and your team.
Distribution Models
TFS Centralized Model
With a Centralized Control System, all the developers have only one version of the files that are held in the server’s repository, which is also responsible for holding the changes and commits history. This means that if developer A wants to see or use something developer B is creating, the developer must wait till the changes arrive in the centralized repository to sync their local files.
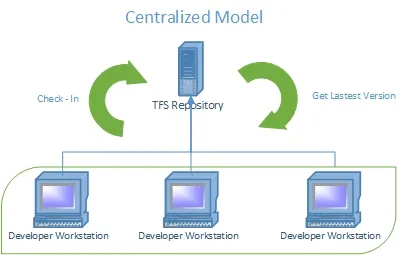
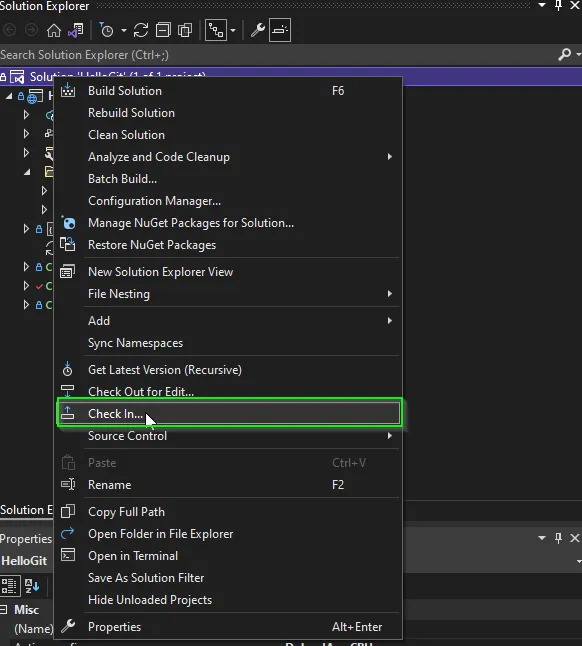
This model is pretty straightforward, you get the latest source code version (Get Latest Version), make your local changes, and then commit them (Check In) to the repo. If you wanted to get further with your changes you could always Check out a file and lock it to prevent others from changing it. That’s why we loved it!
GIT Distributed Model
Contrary to the Centralized Model, in a Distributed Model each developer gets their local repository, which means each developer can commit, create branches, and perform merge operations in their local repository without being worried about messing up the server repository. Following the previous example, if developer A wants to access developer B’s changes, then A can offer a hub so B can pull the required commit/history into their local repository.
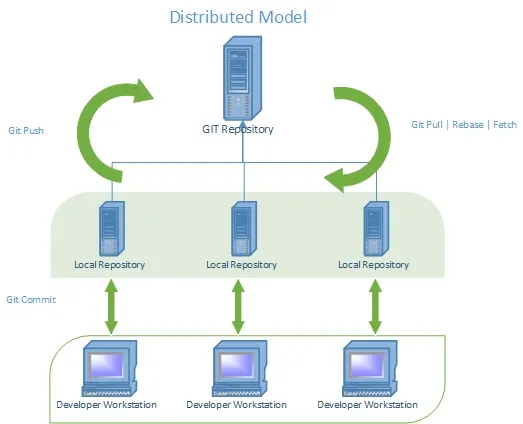
This GIT model helps us to distribute our work smoothly with our organization. Not only that, our distribution model can be managed differently depending on our organization or requirements, which proves to be a huge advantage over the centralized model which offers only one way of managing your code.
As you’ve been following a Centralized Model, I recommend that you tweak a few things of it, before implementing any other workflow:
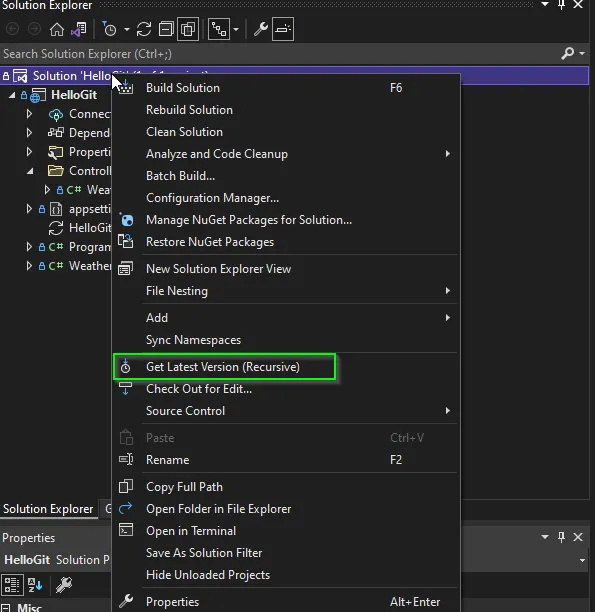
Get Latest Changes
First, clone your repository to your local workplace using Visual Studio or git commands (I strongly recommend doing commands instead). In Visual Studio, just follow the “Clone a repository” wizard steps.
// To download a repository and get the latest changes.
git clone <<YOUR_REPOSITORY_URL>>
You’ve got the latest, but the code keeps on moving
Git offers you Fetch and Pull to download the latest changes from any of your remote branches.
Fetch: Downloads commits, objects, and references from one or more branches, this is usually used to list changes and review them before pulling them to your local instance. This gives you a general idea of what changes are gonna be introduced, preparing you for possible merge conflicts once you pull/merge them.
Pull: As fetch, pull will also download commits, objects, and references from one or more branches, but contrary to fetch, it will try to automatically merge (or rebase) those changes to your local workspace. So in other words git pull is just a shortcut for git fetch && git merge.
I’ve got to mention here is where conflicts may occur, it happens to everyone and …

But don’t worry, most of them are easy to solve, if you need help, here’s a good article on how to solve git conflicts.
* git merge is used to join two or more commits/histories together. To perform this, git will create a new commit to show the combination of both commits.
// To fetch data from all your branches e.g: git fetch origin || git fetch
git fetch <<REMOTE>>
// To fetch data from a specific branch e.g: git fetch origin develop
git fetch <<REMOTE>> <<BRANCH_NAME>>

// To pull data from all your branches e.g: git pull origin || git pull
git pull <<REMOTE>>
// To pull data from a specific branch e.g: git pull origin develop
git pull <<REMOTE>> <<BRANCH_NAME>>

Check In Changes
Here is where you’ll see some differences in how TFS and GIT work. A TFS Check In sends your changes to the remote repository, and, if changes were made in the repo before yours it may cause conflicts if you are not aware of what you’re doing the entire branch can be messed up and everyone will lose their minds.
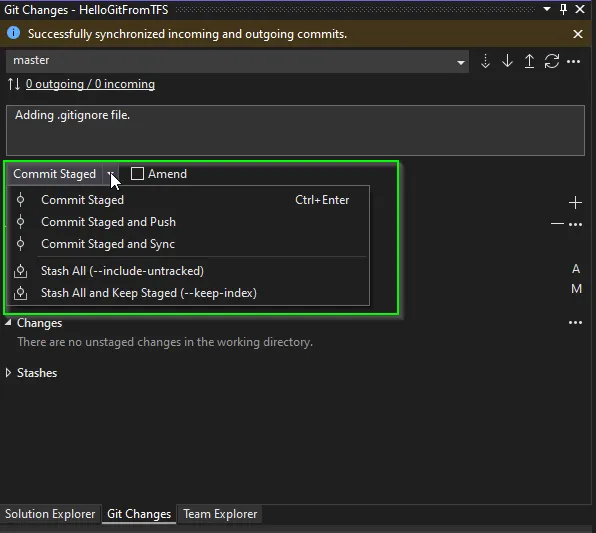
Git offers you Commit and Push commands to first save your changes in your local branch (commit) and send those commits (push) to the remote repository.
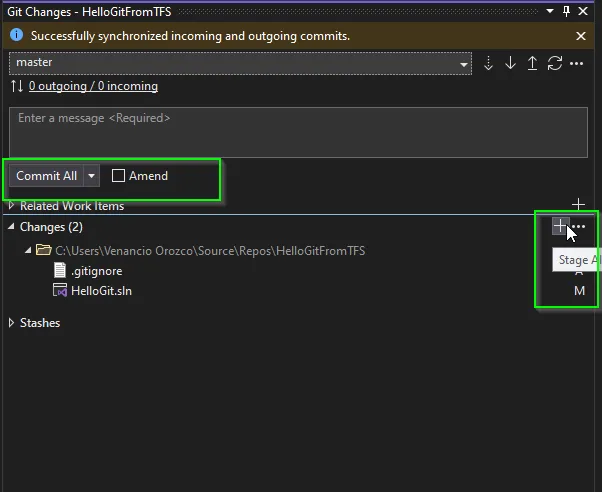
Commit: Creates a new commit containing a record of staged changes made to the repository, as in check-in on TFS a commit message is required so it can be tracked.
* Staged changes are considered ‘safe’ snapshots of your code as they won’t change unless you directly modify them. For staging changes, we use a different command git add. Git will commit only your staged files.
Push: Sends your local commits to your remote repository. As there’s a possibility to overwrite changes, git may prevent you to do it in certain scenarios.
// Stage your files e.g: 'git add .gitignore'
git add <<file>>
// Stage your directories e.g: 'git add assets' or 'git add .' to add all directories recursively.
git add <<directory>>
// Commit your staged files e.g: 'git commit -m 'Adding .gitignore file'
git commit -m '<<YOUR_COMMIT_MESSAGE>>'
// Push your changes to your remote repository e.g: git push origin develop
// Another option is just to 'git push' your changes which will use your current remote and branch
git push <<remote>> <<branch>>
It seems overwhelming to have a lot of new commands to perform just two operations, but when you became used to it, you can start digging for all the cool stuff git can do for you. Merging, rebasing, squashing commits, re-writing commit histories, re-writing commit messages, resetting and reverting commits, and easily creating branches and pull requests.

Ok ok, let’s slow down a little. Having a good branch architecture will help your learning curve to be less pronounced.
Branch Design
Commonly you’ll have a main stable “production” branch which means all the code that is being sent there should have a working system, from a centralized point of view all the developers should commit non-breaking changes to this branch. On the other side of the road is the unstable branch which allows a developer to commit changes that can be broken and don’t affect any release or the main branch.
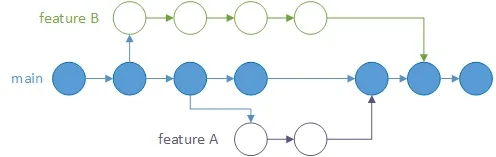
There are plentiful git branch strategies that can work with certain distribution models, due to you are coming from a Centralized Model a good strategy to follow is to create “feature” or also called “topic” branches and integrate them into your main “production” branch as soon as the feature is finished. If you have long-lived branches you can still migrate them to git while adopting the feature branch to any of them.
Don’t be afraid of creating your branches, is not gonna hurt anyone on your team, remember, with git, all your branches are local and the team won’t notice any changes until you merge them to the remote repository.
// To create a branch use git branch. e.g: git branch feature-a
// This will also automatically checkout this branch to your local environment
git branch <<BRANCH_NAME>>
// Use git branch to list your branches and -d to delete them
git branch
// To push your branch changes to the remote repository the first time (assuming it was created locally)
git push -u <<REMOTE>> <<BRANCH_NAME>> // e.g: git push -u origin feature-a
* git checkout <<BRANCH_NAME>> will download and place your local repository to that specific branch, this can also be used to switch between branches.
Let’s say you have finished a feature in your branch and your commits are already on your remote repo, how will you integrate those changes to the main branch?
Merge Strategy
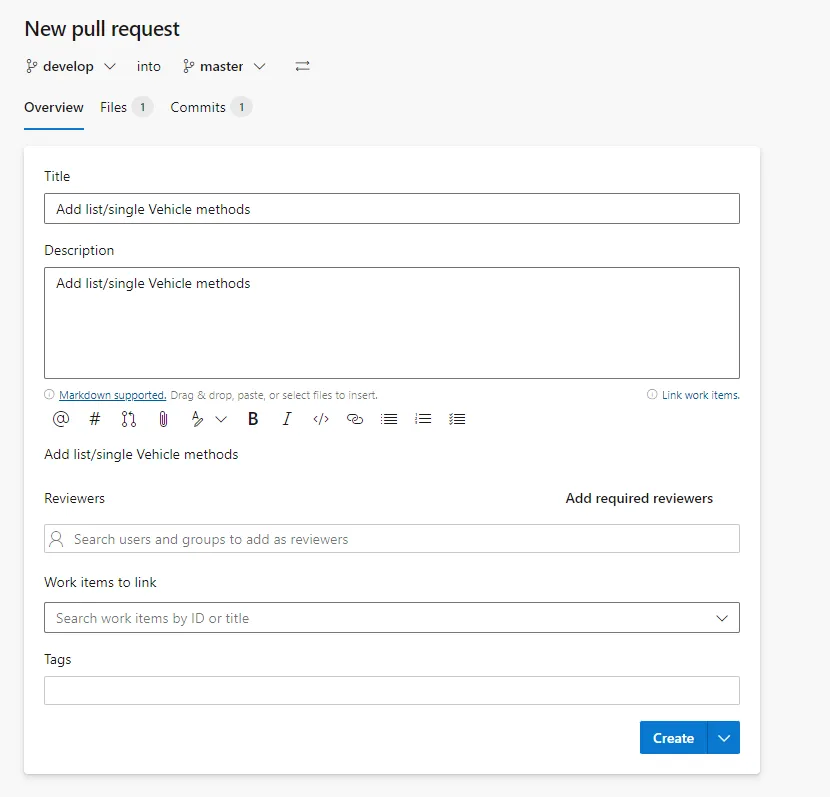
The easiest way to go here is to follow your code hosting platform (GitHub, Azure, Bitbucket, etc.) tools. Once you have your branch in place you can place a Pull Request to a specific branch (main). And once it is approved, the system will handle the merging.
*A Pull Request generates a request asking for your project or branch to pull changes into their tree. It is also a cool mechanism to notify your team members that you have completed a feature and want to merge it into a stable branch.

Merge will merge all the commits you did in your branch onto the main branch.
Squash will grab all your commits and create a single one which then will be merged onto the main branch. This is better for history visualization, as it will shorten commits history but you’ll lose some details that could be used later on.
Rebase will place your branch on top of the main branch and then apply your changes.
Semi-linear merge will do a rebase and then a merge operation.
⚠️ It is crucial to define your merging constraints so you and your team can properly create a pattern to follow when something goes wrong, ask yourself if is it ok to have failed tests in this branch. or are we squashing commits and rebasing or merging? do we need to see all the history or just the important commits?
One last thing, depending on the policies and constraints you or your company decided on before, you can delete the feature branch after being merged. This could help in having a cleaner repository. Some others prefer keeping them for a while; until something gets released. Again it’s a decision you’ll have to make as part of your constraints and policies.
Bonus
There are a lot of useful commands to use on a daily basis that will help you through your journey. I want to list some of them:
// Let's say you want to download a branch but you have changes in your repository
// Use git stash to move out those changes to a new temp directory
git stash // use -u to stash untracked (or unstaged) changes or -m to include a message
git stash list // to list all your stashed data
git stash apply or git stash pop // to apply saved stash to your working directory, pop will automatically delete the stash after applying
git stash drop // to delete a stash
// Simply show the commit logs.
git log
git log --graph --oneline --decorate // Will represent the commits in a graph structure.
git log --oneline // To visualize commits in one line.
// There are a lot of options for git log, and it's impossible to list them all,
// take a look to the git documentation for further information.
And that’s it! This is all you need to start working fully on git without coming back to TFS, it’s an oversimplified solution but it will allow you to learn and grow your skills with confidence, don’t be afraid of failing while using git, all your commits, merges, rebases, and even branch integrations can be reverted with few commands, just don’t do production deployments on Fridays while you’re still doing baby steps on git, it will save you a lot of frustrations.

.png)
.png)
%20for%20Angular%2019.png)